IKLAN

Theme images by kelvinjay. Powered by Blogger.

Tutorial

HEBOH

Kuliner

Youtube Tutorial

Games

Lowongan Kerja

OpenSource

Cara Membuat Aplikasi Tweetdect di Linux

Ditemani kopi hangat, pas banget karena suasana saat hujan maka kalian akan saya ajak bergalau ria cara membuat aplikasi tweetdect dengan python, sebelumnya apakah kalian sudah tahu tweetdect itu sendiri kan??


sejenis aplikasi berbasis dekstop dan web, sayang untuk dekstop sendiri baru tersedia untuk windows dan mac os, tapi tenang semua itu bisa diakali kok, sebenarnya aplikasi yang akan kita buat nanti adalah aplikasi semacam web browser tapi kita tanamkan di os linux kita sehingga serupa dengan aplikasi dektop lainya, okey langsung saja kita buat

sarat mutlak pertama adalah OS Linux kamu harus sudah terinstall python, dan semua distro linux sudah terdefault terinstall python, dalam hal ini saya menggunakan editor geany, jika belum punya silahkan install terlebih dahulu

1. buka geany, pastekan code berikut ini
 #!/usr/bin/env python  
import gtk, webkit
from PyQt4.QtWebKit import *
from PyQt4.QtNetwork import *
USER_AGENT = "Mozilla/5.0 (X11; Ubuntu; Linux i686; rv:15.0) Gecko/20100101 Firefox/15.0.1"
def customuseragent(url):
print 'called for %s' % url
return 'custom ua'
def tombol(widget):
add = alamat.get_text()
if add.startswith("http://"):
web.open(add)
else:
add = "http://" + add
alamat.set_text(add)
web.open(add)
def new_title(view, frame, title):
win.set_title(title)
def on_click_link(view, frame):
uri=frame.get_uri()
alamat.set_text(uri)
def testproxy(self):
webkit.set_proxy("socks5://127.0.0.1:1111")
self.assertTrue(True)
win = gtk.Window()
win.set_default_size(1000,600)
win.connect('destroy',lambda w: gtk.main_quit())
box1 = gtk.VBox()
win.add(box1)
box2 = gtk.HBox()
box1.pack_start(box2, False)
alamat = gtk.Entry()
box2.pack_start(alamat)
gobutton = gtk.Button("Go")
box2.pack_start(gobutton)
gobutton.connect('clicked', tombol)
scroller = gtk.ScrolledWindow()
box1.pack_start(scroller)
web = webkit.WebView()
web.open("http://tweetdeck.twitter.com/")
web.connect("title-changed", new_title)
#web.connect("navigation-requested", on_click_link)
web.connect("load-committed", on_click_link)
scroller.add(web)
win.show_all()
gtk.main()

kemudian simpan file diatas dengan nama tweetdect.py
2. install programnya
dalam hal ini saya menyimpan di /home/sandyhackers/python/
maka, ketikan perintah berikut

sandyhackers@sandy:~/python$ sudo cp tweetdeck.py /usr/bin/tweetdect
sandyhackers@sandy:~/python$ sudo chmod +x /usr/bin/tweetdect
sandyhackers@sandy:~/python$ wget http://www.icon100.com/up/3586/96/tweetdeck.png


3. Pasang di start menu
sandyhackers@sandy:~/python$ sudo geany /usr/share/applications/tweetdect.desktop
isi dengan script berikut

 [Desktop Entry]  
Name=Tweetdect
GenericName=Tweetdect Twitter
Comment=Free Tweets and Ngalai
Exec=tweetdect
Icon=/home/sandyhackers/python/tweetdeck.png
StartupNotify=true
Terminal=false
Type=Application
Categories=Network;InstantMessaging;
X-MessagingMenu-UsesChatSection=true
X-Ubuntu-Gettext-Domain=tweetdeck

4. jalankan program
klik start > internet > tweetdect
jangan lupa add twitter saya, @sandyhackers

Cara Install Spotify di Linux (Ubuntu dan Debian)


Cara Install Spotify di Linux , bagi kalian yang suka mendengarkan music tentu tidak asing lagi dengan aplikasi ini, ya.. spotify! salah satu situs penyedia layanan terbesar menurut saya pribadi, dan terbaik pokoknya, banyak fitur yang tersedia, pokoknya super deh!

Dan kabar gembiranya, sekerang aplikasi spotify sudah tersedia di OS Linux Ubuntu/Debian, menarik bukan?hihihi tertarik untuk menginstall di Ubuntu anda? oke silahkan ikuti tutorial berikut ini

1. Tambahkan repositori spotify di sourcelist kalian$ sudo nano /etc/apt/source.list
#spotify
deb http://repository.spotify.com stable non-free
2. tambahkan ppa
$ sudo apt-key adv --keyserver keyserver.ubuntu.com --recv-keys 94558F59
3. Update repo kalian
$ sudo apt-get update
4. Install spotify
$ sudo apt-get install spotify-client
5. Fix error
jika terjadi error saat menjalankan spotify jalankan command berikut di terminal
$ sudo apt-get install -f
$ sudo apt-get install libssl0.9.8


jalankan aplikasinya, yang belum daftar klik sign up, bagi yang sudah silahkan sign in,cari lagu berdasarkan genre, judul, artist, mood, album dan sebagainya..

jangan lupa follow punya saya, Rahmad Sandy Kurnia
sekian dan terimakasih, semoga bermanfaat


berhubung banyak yang tanya kenapa spotify tidak bisa diputar menggukan koneksi internet indonesia, jawabnya karena untuk sementara ini spotify belum support untuk bahasa indonesia, namun tenang saja, kita tetap bisa mendengarkan musik koks, caranya mudah. cukup gunakan ip luar negeri, dalam kasus ini saya menggukan ssh server US, bisa juga dengan ssh SG.GS, semua tergantung selera, lalu bagaimana caranya??
 

1. install tun2socks
based ubuntu
add-apt-repository ppa:ambrop7/badvpn
apt
-get update
apt
-get install badvpn

2. install app tunnel
a. bitvise
normalnya, aplikasi ini hanya support untuk windows, tapi bisa berjalan di linux dengan wine
bisa di download sini http://www.bitvise.com/ssh-client-download
b. pac manager
aplikasi tunnelir ini memang dibuat based on linux, artinya bisa berjalan native tanpa bantuan wine
download pac manager disini http://sourceforge.net/projects/pacmanager/
cara installnya
# dpkg -i pac-4.5.2.3-all.deb
# apt-get install -f
Konfigurasi
PAC Manager

  • buat koneksi baru
  • konfigurasi akun vps/ssh

  • setting local forwarding, saya isi dengan port 1080
  • login


Bitvise

  • atur settingan sesuaikan dengan gambar beriku
3. jalankan badvpn
 badvpn-tun2socks --tundev tun0 --netif-ipaddr 10.0.0.2 --netif-netmask 255.255.255.0 --socks-server-addr 127.0.0.1:1080 --udpgw-remote-server-addr 127.0.0.1:7300
4. routing koneksi
kali saya menggunakan provider indosat, maka routing seperti berikut:
 #!/bin/sh
#DEFAULT#
ifconfig tun0 10.0.0.1 netmask 255.255.255.0
route del -net 0.0.0.0 netmask 0.0.0.0 gw 0.0.0.0 ppp0
route add default gw 10.0.0.2 metric 6

#INDOSAT#
route add 10.19.19.19 gw 10.64.64.64 metric 5
route add 202.152.165.39 gw 10.64.64.64 metric 5
route add 114.5.5.77 gw 10.64.64.64 metric 5
untuk operator lain:
#Telkomsel
route add 10.1.89.130 gw 10.64.64.64 metric 5
route add 114.127.208.84 gw 10.64.64.64 metric 5
route add 202.3.208.11 gw 10.64.64.64 metric 5

#XL#
route add 202.152.240.50 gw 10.64.64.64 metric 5
route add 112.215.71.243 gw 10.64.64.64 metric 5
route add 112.215.71.242 gw 10.64.64.64 metric 55
 4. jalankan spotify
jika respon tunsocks seperti gambar berikut maka kamu sudah bisa menikmati aplikasi ini

Cara Menjalankan Whatsapp via Pidgin di Linux

Alhamduliah, bisa chatingan dengan whatsapp, kata-kata itu selalu saya ucapkan selalu, mengingat saya sendiri tidak punya hp Android, masih setia dengan hp jadul nokia, hahaha
untuk itu kali saya akan membagikan tips bagi kalian bagaimana cara whatsapp'an menggunakan pidgin, tanpa harus beli hp android tentunya

1. Tambahkan Repo
sebelum install plugin pidgin khusus whatsapp tambahkan dulu repositorynya, caranya jika menggunakan ubuntu
sudo nano /etc/apt/sources.list
lalu tambahkan repo berikut pada baris paling bawah
deb http://ppa.launchpad.net/whatsapp-purple/ppa/ubuntu quantal main 

deb-src http://ppa.launchpad.net/whatsapp-purple/ppa/ubuntu quantal main
simpan dan update, caranya
sudo apt-get update

2. install pluginya
sudo apt-get install pidgin-whatsapp

3. compile dan install whatsapp
jika kalian menggunakan debian
 silahkan download sourcenya disini 
masuk sebagai root
su
dpkg -i pidgin-whatsapp_0.2-2_i386.modfied.deb

a. Download Clone dari github
git clone http://github.com/davidgfnet/whatsapp-purple.git
b. install depedency yang diperlukan
opsi ini tidak diperlukan jika sudah rebuild dan tidak error pada langkah selanjutnya
sudo apt-get install build-essential automake autoconf libtool pkg-config libcurl4-openssl-dev intltool libxml2-dev libgtk2.0-dev libnotify-dev libglib2.0-dev libevent-dev checkinstall
saatnya compile dan make install
cd whatsapp-purple


make -f Makefile64 && checkinstall
dan nanti akan muncul sign seperti ini
Debian package creation selected ***

*****************************************


This package will be built according to these values:


0 - Maintainer: [ root@debian ]

1 - Summary: [ Package created with checkinstall 1.6.2 ]

2 - Name: [ whatsapp ]

3 - Version: [ purple ]

4 - Release: [ 1 ]

5 - License: [ GPL ]

6 - Group: [ checkinstall ]

7 - Architecture: [ amd64 ]

8 - Source location: [ whatsapp-purple ]

9 - Alternate source location: [ ]

10 - Requires: [ ]

11 - Provides: [ whatsapp ]

12 - Conflicts: [ ]

13 - Replaces: [ ]


Enter a number to change any of them or press ENTER to continue:
ganti opsi no 3 menjadi 1
jika sudah nanti tinggal registrasi menggunakan yowsup-cli yang akan saya jelaskan pada langkah berikutnya

Jika kalian menggunakan ubuntu (debian juga ikut ya.. buat register)
a. install yowsub-cli
apt-get install python python-dateutil python-argparse git
b. download paketnya menggunakan method git dan wget
git clone http://github.com/tgalal/yowsup.git

wget https://github.com/tgalal/yowsup/archive/master.zip
c. Unzip dan pindah direktori
unzip master.zip

cd yowsup-master/src
d. register no hp kalian ke server whatsapp
silahkan gunakan no internasional berdasarkan code negara, jika indonesia menggunakan awalan 62 
jadi bisa seperti ini 6287739564665
e. copy yowsup-cli.config dan edit
cp config.example yowsup-cli.config

nano yowsup-cli.config
dan edit seperti ini pada bagian bawah
cc=62

phone=6285xxxx (sesuaikan dengan no anda)

id=

password=
keluar dan simpan
f. Ubah permissionya dulu
chmod +x yowsup-cli 
g. register whatsapp dengan code dari sms yang kalian terima
./yowsup-cli --register 123-345 --config yowsup-cli.config
kode yang bertanda merah silahkan ganti dengan kode sms yang kalian terima
cihuy, akhirnya bisa teregister juga
status: ok
kind: free
pw: cRVu3u2YaFyns+fG0fikw4/pret:P=
price: Rp9500
price_expiration: 1383554807
currency: IDR
cost: 9500.00
expiration: 1412043732
login: 6287739564665
type: new

type: new

dan tanda yang berwarna hijau adalah password untuk login ke akun whatsapp sobat


Make Local Video Streaming like Youtube

Yeah, finally  i found nice post how to set up Local Video streaming like youtube with clipbucket, u know ClipBucket is an open-source and free Multimedia Management Script used to build your own media sharing site like YouTube, Metacafe, Veoh and Hulu etc. Whether you are a small fan club or a big Multi Tier Network operator, Clipbucket will fulfill your video management needs. 

before, i'll thanks to Senthilkumar from www.unixmen.com, as long i wrote this tutor using Centos Server to setup this website. My Hostname and ip address are video.sandyhackers.com and 192.168.1.200/24. you can this values as per your scenario

first, install mysql-server php, php modules and apache
root@arum:~# yum install mysql mysql-server httpd php php-mysql php-gd php-imap php-ldap php-odbc php-pear php-xml php-xmlrpc php-mbstring wget unzip -y 

then start apache, mysql service now root@arum:~# /etc/init.d/mysqld startroot@arum:~# /etc/init.d/httpd startroot@arum:~# chkconfig mysqld onroot@arum:~#chkconfig httpd on
then create mysql root password
root@arum:~#/usr/bin/mysql_secure_installation
NOTE: RUNNING ALL PARTS OF THIS SCRIPT IS RECOMMENDED FOR ALL MySQL       SERVERS IN PRODUCTION USE!  PLEASE READ EACH STEP CAREFULLY! In order to log into MySQL to secure it, we'll need the current password for the root user.  If you've just installed MySQL, and you haven't set the root password yet, the password will be blank, so you should just press enter here. Enter current password for root (enter for none): OK, successfully used password, moving on... Setting the root password ensures that nobody can log into the MySQL root user without the proper authorisation. Set root password? [Y/n] y New password: Re-enter new password: Password updated successfully! Reloading privilege tables..  ... Success! By default, a MySQL installation has an anonymous user, allowing anyone to log into MySQL without having to have a user account created for them.  This is intended only for testing, and to make the installation go a bit smoother.  You should remove them before moving into a production environment. Remove anonymous users? [Y/n]  ... Success! Normally, root should only be allowed to connect from 'localhost'.  This ensures that someone cannot guess at the root password from the network. Disallow root login remotely? [Y/n]  ... Success! By default, MySQL comes with a database named 'test' that anyone can access.  This is also intended only for testing, and should be removed before moving into a production environment. Remove test database and access to it? [Y/n]  - Dropping test database...  ... Success!  - Removing privileges on test database...  ... Success! Reloading the privilege tables will ensure that all changes made so far will take effect immediately. Reload privilege tables now? [Y/n]  ... Success! Cleaning up... All done!  If you've completed all of the above steps, your MySQL installation should now be secure. Thanks for using MySQL!
test your password with
root@arum:~#mysql -u root -p Enter password: Welcome to the MySQL monitor.  Commands end with ; or \g. Your MySQL connection id is 2 Server version: 5.1.69 Source distribution Copyright (c) 2000, 2013, Oracle and/or its affiliates. All rights reserved. Oracle is a registered trademark of Oracle Corporation and/or its affiliates. Other names may be trademarks of their respective owners. Type 'help;' or '\h' for help. Type '\c' to clear the current input statement. mysql> create database clipbucketdb; Query OK, 1 row affected (0.02 sec) 
set default port 80 to route firewall
root@arum:~# nano /etc/sysconfig/iptables# Firewall configuration written by system-config-firewall# Manual customization of this file is not recommended.*filter :INPUT ACCEPT [0:0]:FORWARD ACCEPT [0:0] :OUTPUT ACCEPT [0:0]-A INPUT -p udp -m state --state NEW --dport 80 -j ACCEPT -A INPUT -p tcp -m state --state NEW --dport 80 -j ACCEPT-A INPUT -p udp -m state --state NEW --dport 53 -j ACCEPT

so, restart ip tables changes
root@arum:~# /etc/init.d/iptables restart

Disable SELinux and reboot your system:
root@arum# vi /etc/sysconfig/selinux 
# This file controls the state of SELinux on the system.
# SELINUX= can take one of these three values:
#     enforcing - SELinux security policy is enforced.
#     permissive - SELinux prints warnings instead of enforcing.
#     disabled - No SELinux policy is loaded.
SELINUX=disabled
# SELINUXTYPE= can take one of these two values:
#     targeted - Targeted processes are protected,
#     mls - Multi Level Security protection.
SELINUXTYPE=targeted
The following prerequisties will not be found in Official repositories. So let us install additional  repositories RPMForgeEPEL and RPMFusion:
[root@server src]# rpm -ivh http://dl.fedoraproject.org/pub/epel/6/i386/epel-release-6-8.noarch.rpm
[root@server ~]# rpm -ivh http://pkgs.repoforge.org/rpmforge-release/rpmforge-release-0.5.3-1.el6.rf.i686.rpm
[root@server src]# rpm -ivh http://download1.rpmfusion.org/nonfree/el/updates/6/i386/rpmfusion-nonfree-release-6-1.noarch.rpm
[root@server src]# rpm -ivh http://download1.rpmfusion.org/free/el/updates/6/i386/rpmfusion-free-release-6-1.noarch.rpm
Now install these additional prerequisites.
[root@server ~]# yum groupinstall "Development Tools"
[root@server ~]# yum install lame mencoder ffmpeg flvtool2 libogg libvorbis freetype-devel SDL-devel freeglut-devel zlib gpac -y
Open your php.ini file and set change the values as shown below. To find the php.ini file enter the command:
[root@server ~]# php -i|grep php.ini
Configuration File (php.ini) Path => /etc
Loaded Configuration File => /etc/php.ini
PHP Warning:  Unknown: It is not safe to rely on the system's timezone settings.
You are *required* to use the date.timezone setting or the date_default_timezone_set() function. In case you used any of those methods and you are still getting this warning, you most likely misspelled the timezone identifier. We selected 'Asia/Calcutta' for 'IST/5.0/no DST' instead in Unknown on line 0
Now open the php.ini file and edit as follows:
[root@server ~]# vi /etc/php.ini 

[...]
upload_max_filesize = 500M
max_execution_time = 36000
max_input_time = 600
memory_limit = 5000M
magic_quotes_gpc = On
magic_quotes_runtime = Off
register_globals = Off
output_buffering = Off
display_errors = On
short_open_tag = On
date.timezone = Asia/Calcutta
Save and exit the file. To find your time zone navigate to http://www.php.net/manual/en/timezones.php.
Install PHPShield Loaders
PHPShield is an application that is used to protect the code in a 2 core files within PHPmotion. In order for PHPmotion to run, your server will need to have the PHPShield loaders correctly installed.
Download PHPShield Loaders
Find the PHP extensions directory first:
[root@server ~]# php -i|grep extension_dir
extension_dir => /usr/lib/php/modules => /usr/lib/php/modules
Now go to extension directory and download the phpshield loader. You can download the phpshield loaders here:
[root@server ~]# cd /usr/lib/php/modules/
[root@server modules]# wget http://www.phpshield.com/loaders/ixed4.lin.x86-32.zip
If you are using 64bit system, use this command instead:
[root@server modules]# wget http://www.phpshield.com/loaders/ixed4.lin.x86-64.zip
Extract and export the phpshield loader value to your php.ini file. If you are using php version 5.3, then you should export ixed5.3 extension to your php.ini file:
[root@server modules]# unzip ixed4.lin.x86-32.zip 
[root@server modules]# echo "extension=ixed.5.3.lin" >> /etc/php.ini
Finally, reboot the system once to save and activate all settings.
Install ClipBucket
Download the latest version of ClipBucket here.
Extract the downloaded file:
[root@server ~]# unzip clipbucket-2.6-r738-security-fixed-p3.zip
This will extract the ClipBucket zip file to your current directory. Copy the contents of /upload folder to Apache root document folder.
[root@server ~]# cp -rf upload/* /var/www/html/
[root@server ~]# cp .htaccess /var/www/html/
Now set the full permissions to the following directories:
[root@server ~]# chmod -R 777 /var/www/html/includes/
[root@server ~]# chmod -R 777 /var/www/html/files/
[root@server ~]# chmod -R 777 /var/www/html/files/conversion_queue/
[root@server ~]# chmod -R 777 /var/www/html/files/logs/
[root@server ~]# chmod -R 777 /var/www/html/files/original/
[root@server ~]# chmod -R 777 /var/www/html/files/temp/
[root@server ~]# chmod -R 777 /var/www/html/files/thumbs/
[root@server ~]# chmod -R 777 /var/www/html/files/photos/
[root@server ~]# chmod -R 777 /var/www/html/files/videos/
[root@server ~]# chmod -R 777 /var/www/html/files/mass_uploads/
[root@server ~]# chmod -R 777 /var/www/html/files/temp/install.me
[root@server ~]# chmod -R 777 /var/www/html/images/
[root@server ~]# chmod -R 777 /var/www/html/images/avatars/
[root@server ~]# chmod -R 777 /var/www/html/images/backgrounds/
[root@server ~]# chmod -R 777 /var/www/html/images/collection_thumbs/
[root@server ~]# chmod -R 777 /var/www/html/images/groups_thumbs/
[root@server ~]# chmod -R 777 /var/www/html/includes/langs/en.lang
[root@server ~]# chmod -R 777 /var/www/html/cache/
[root@server ~]# chmod -R 777 /var/www/html/cache/comments/
[root@server ~]# chmod -R 777 /var/www/html/cache/userfeeds/
[root@server ~]# chmod -R 777 /var/www/html/cb_install/
Begin Installation
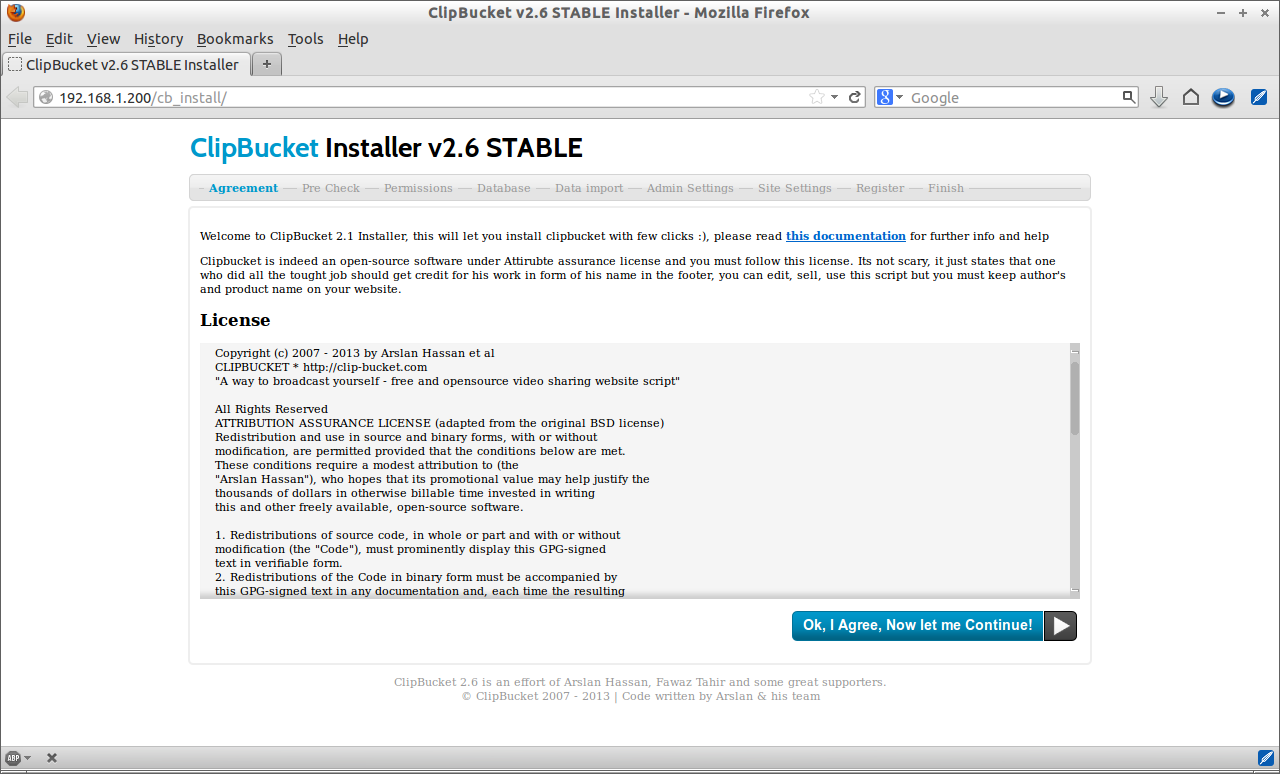
Navigate to http://ip-address or domain-name/cb_install/ from your browser and follow the on screen instructions.
ClipBucket v2.6 STABLE Installer - Mozilla Firefox_001
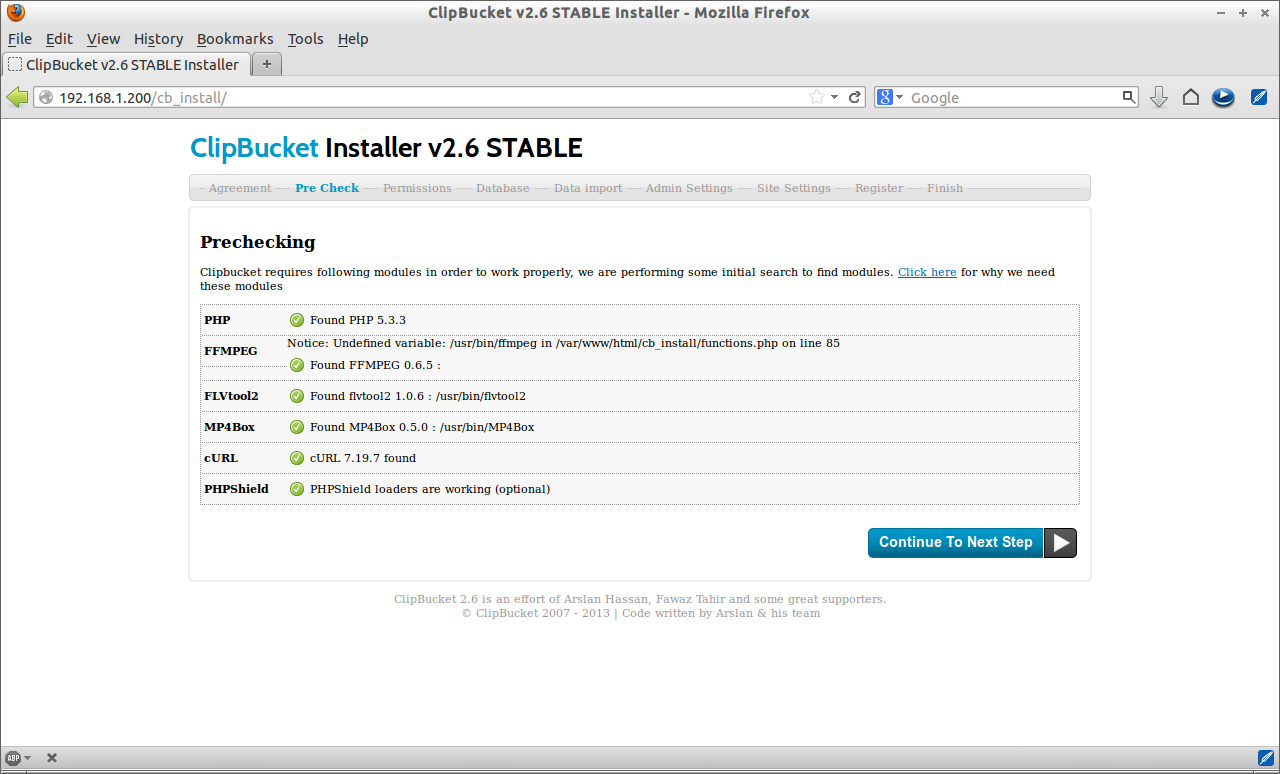
Click Continue.
ClipBucket v2.6 STABLE Installer - Mozilla Firefox_002
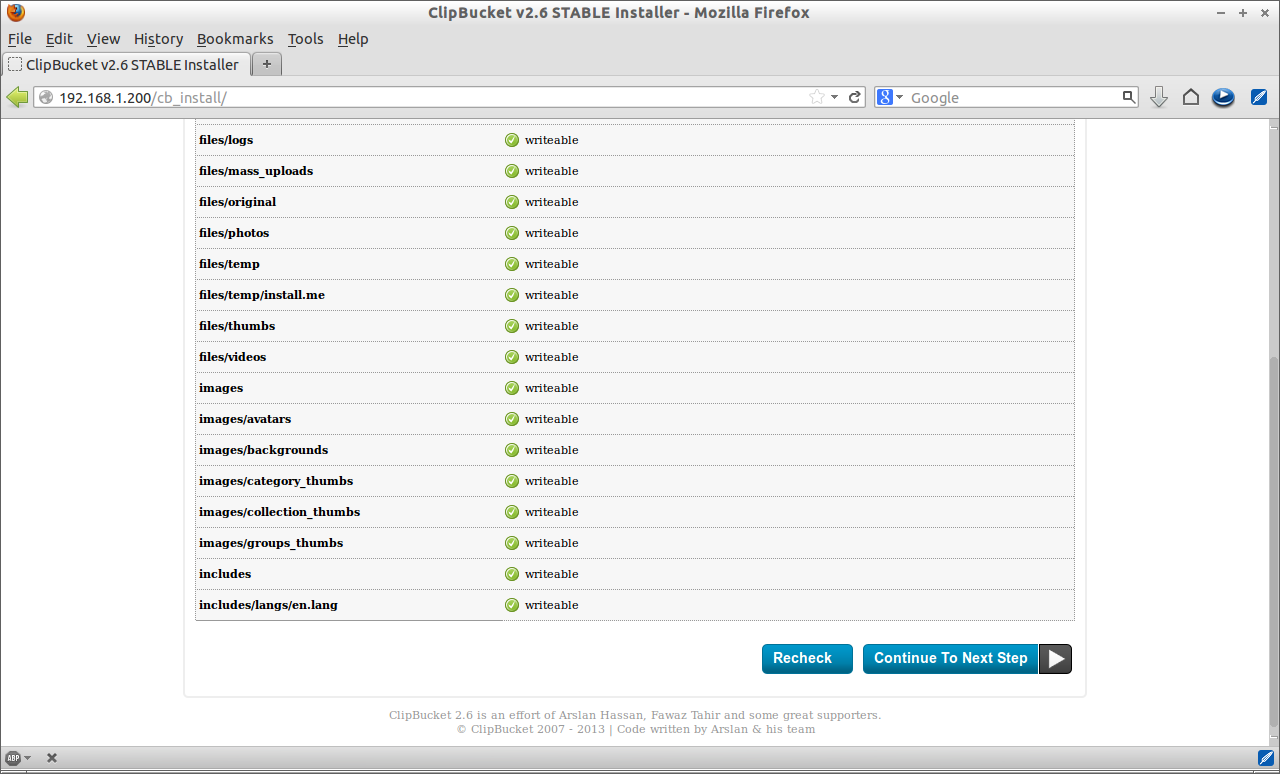
It will check the files/folders permissions now, if everything seems ok, click Continue.
ClipBucket v2.6 STABLE Installer - Mozilla Firefox_003
Enter the database name, database user and password. Click Continue.
ClipBucket v2.6 STABLE Installer - Mozilla Firefox_004
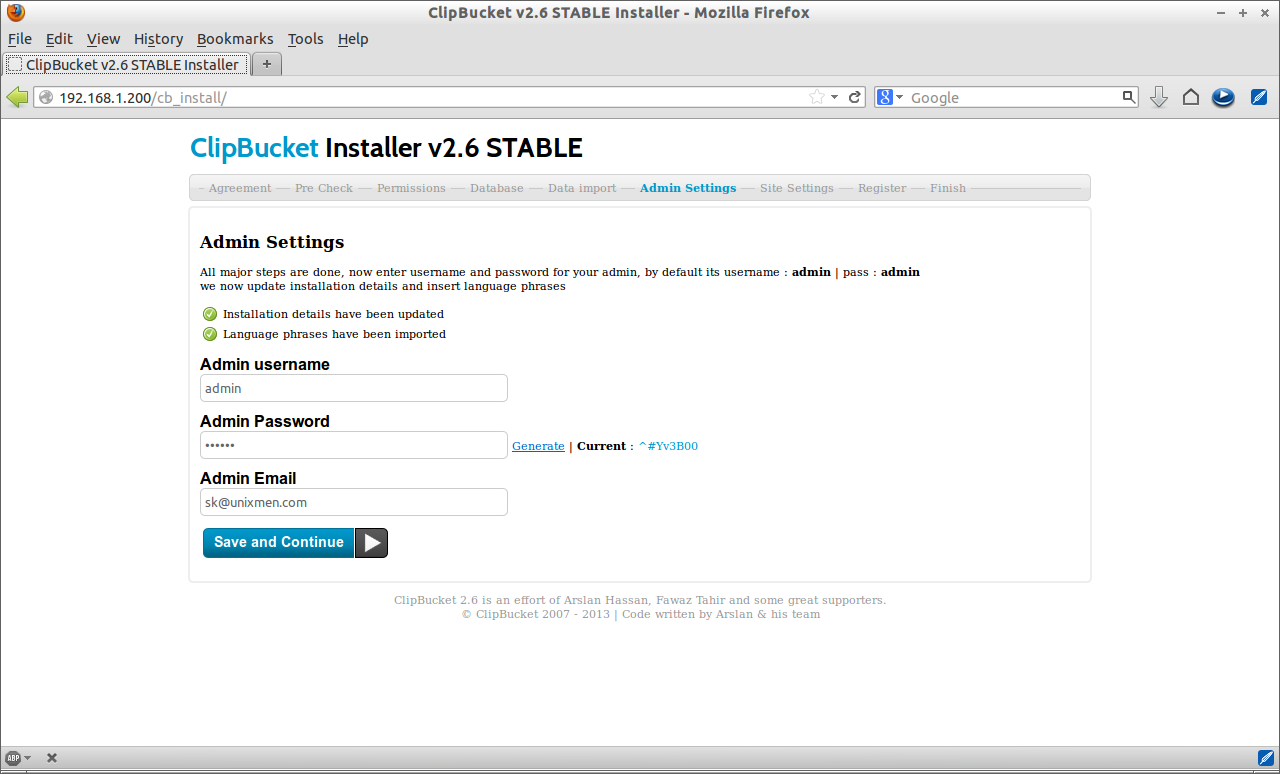
Enter the Administrative account details and click Continue.
ClipBucket v2.6 STABLE Installer - Mozilla Firefox_005
Enter the site name, site slogan and site URL etc and click Continue.
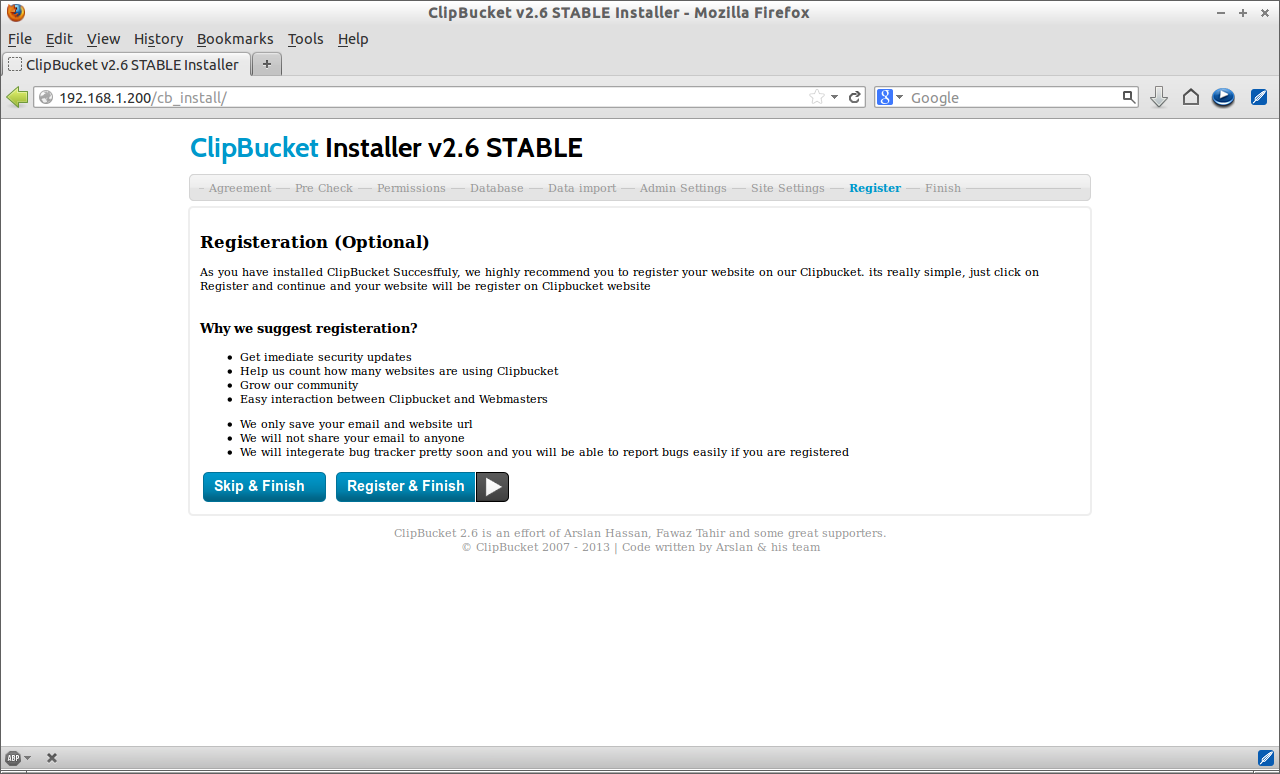
ClipBucket v2.6 STABLE Installer - Mozilla Firefox_006
The registration page will appear. It is optional. You can skip and finish the installation.
ClipBucket v2.6 STABLE Installer - Mozilla Firefox_007
Now the ClipBucket has been installed.
ClipBucket v2.6 STABLE Installer - Mozilla Firefox_008
Post Installation
Delete the /db_install folder. And also don’t forget to change the permission of directory /includes to 755.
[root@server ~]# rm -fr /var/www/html/cb_install/
[root@server ~]# chmod -Rv 755 /var/www/html/includes/
Add the following line in your crontab as shown below:
[root@server ~]# vi /var/spool/cron/root 
* * * * * php -q /var/www/html/actions/video_convert.php
* * * * * php -q /var/www/html/actions/verify_converted_videos.php
0 0,12,13 * * * php -q /var/www/html/actions/update_cb_stats.php
Restart the cron daemon:
[root@server ~]# service crond restart
Now login to admin by clicking on Continue to Admin Area. Enter the username and password. Or navigate to http://ip-address or domain-name/admin_area from your browser.
Unixmen Media Site › Admin Login - Mozilla Firefox_009
This is how my Administration Page looks:
Unixmen Media Site › Administration Panel - Mozilla Firefox_010
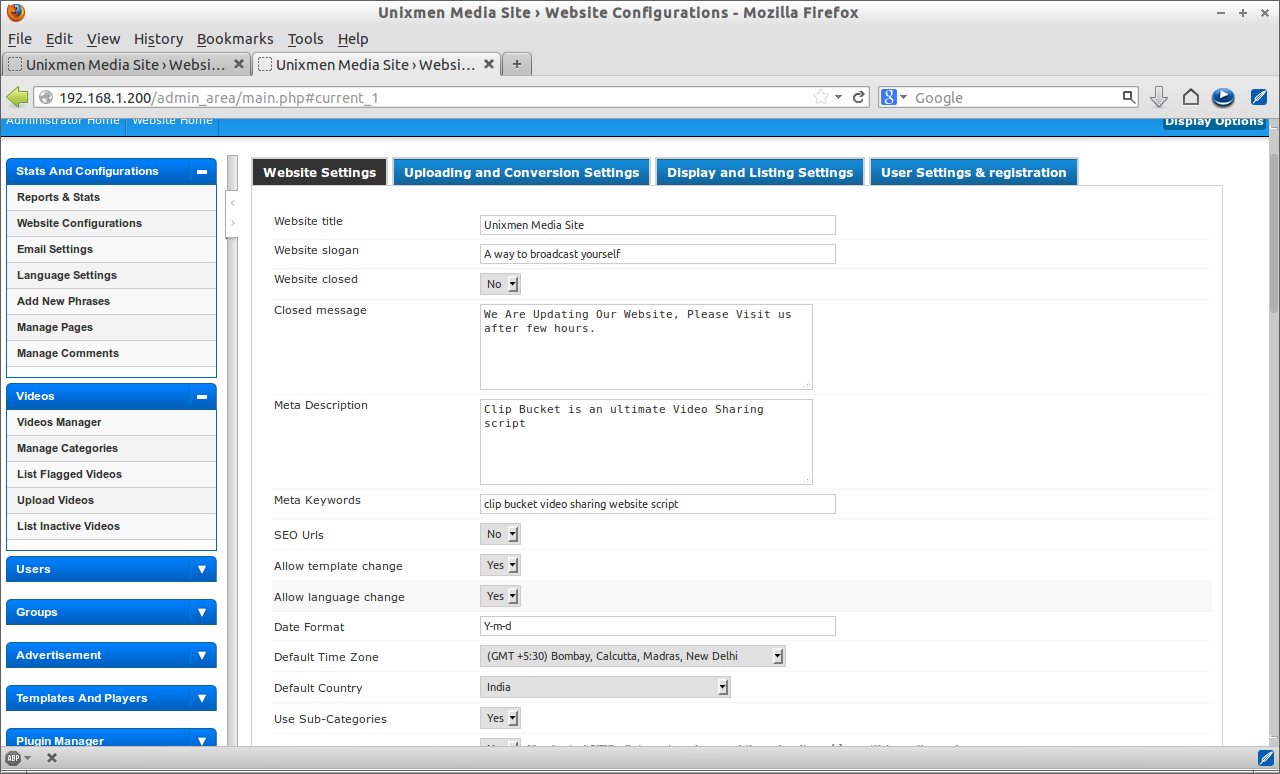
In this page you can create users, groups, collections and can upload media files so on. Before going further, we must do the following tasks. Go to Stats and Configurations on left pane. Click on Website Settings. Make sure you have given all the required values such as website name, slogan and timezone.
Unixmen Media Site › Website Configurations - Mozilla Firefox_020
Unixmen Media Site › Website Configurations - Mozilla Firefox_021
Unixmen Media Site › Website Configurations - Mozilla Firefox_022
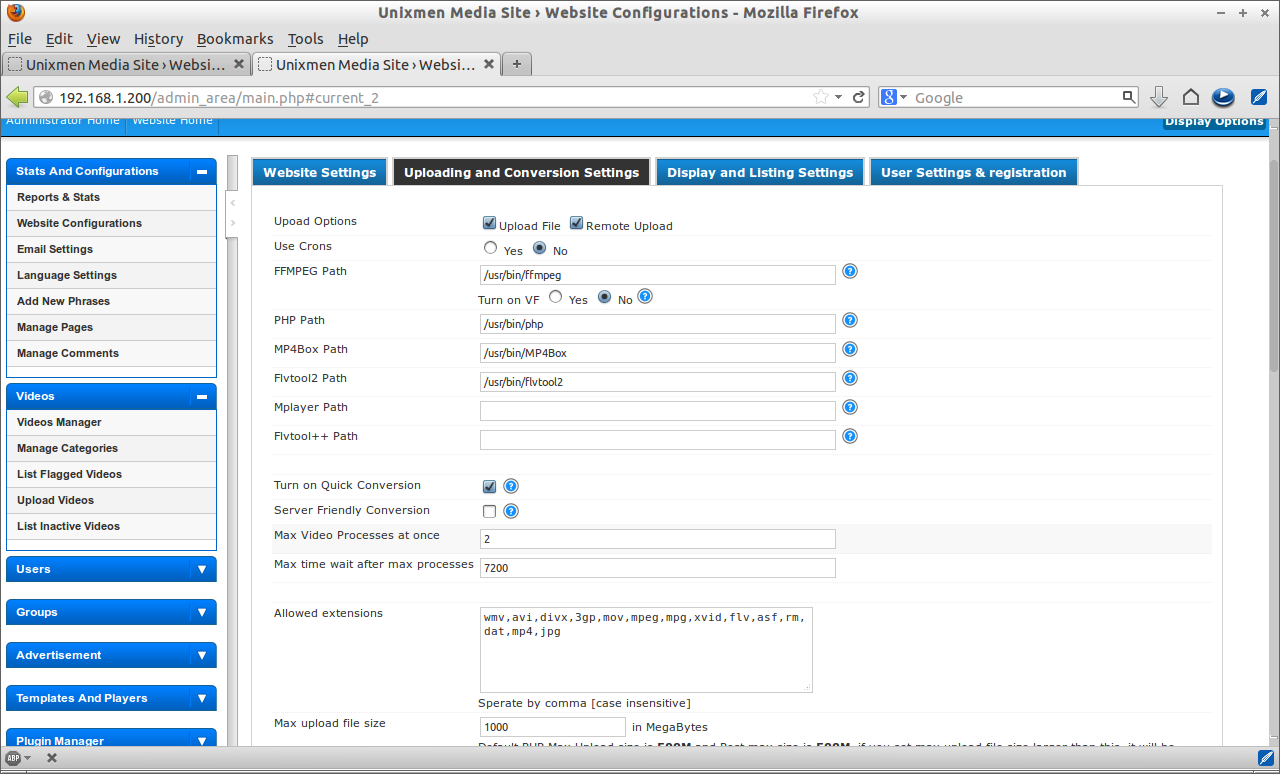
After you entered everything, click Update Settings. Navigate to Uploading and Conversion Settings tab. Check the paths of all modules are correct.
Important: Double check the FFMPEG, PHP, MP4Box and Flvtool2 paths.
Unixmen Media Site › Website Configurations - Mozilla Firefox_023
Unixmen Media Site › Website Configurations - Mozilla Firefox_024
Unixmen Media Site › Website Configurations - Mozilla Firefox_025
If you have any doubts on the settings, please refer the screenshots.
If all the values are valid click Update settings.
Navigate to Tool Box on the left pane and click Server Modules Info. If you have given the correct path in your previous steps, every modules should work as shown in the below screen shot.
Unixmen Media Site › ClipBucket Server Module Checker - Mozilla Firefox_027
That’s it. Now the initial configuration is done.
Test ClipBucket
Let us add a sample video to our media site. Go to the ClipBucket Administration area (http://ip-address/admin_area/).
Unixmen Media Site › Admin Login - Mozilla Firefox_028
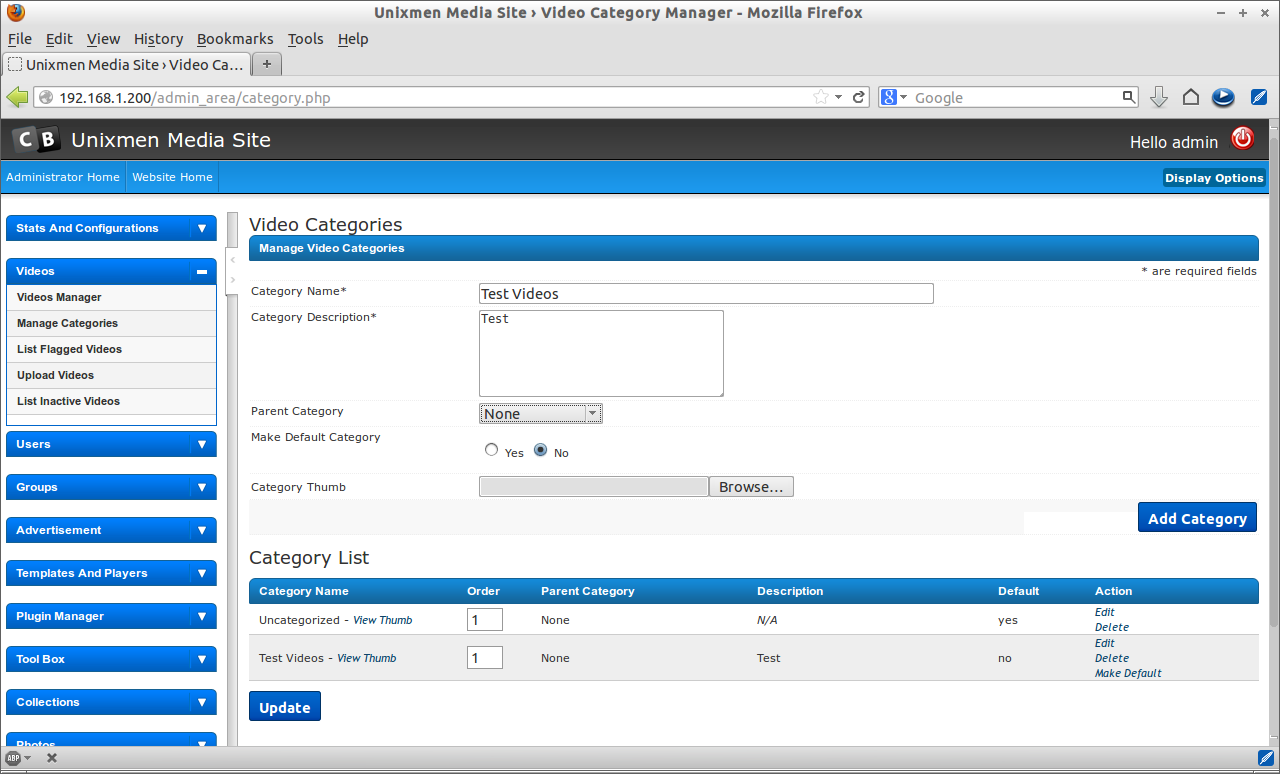
Navigate to Videos -> Manage Categories. Enter the category name and description. Click Add Category.
Unixmen Media Site › Video Category Manager - Mozilla Firefox_029
Go to your Homepage (http://ip-address or Domain-name).
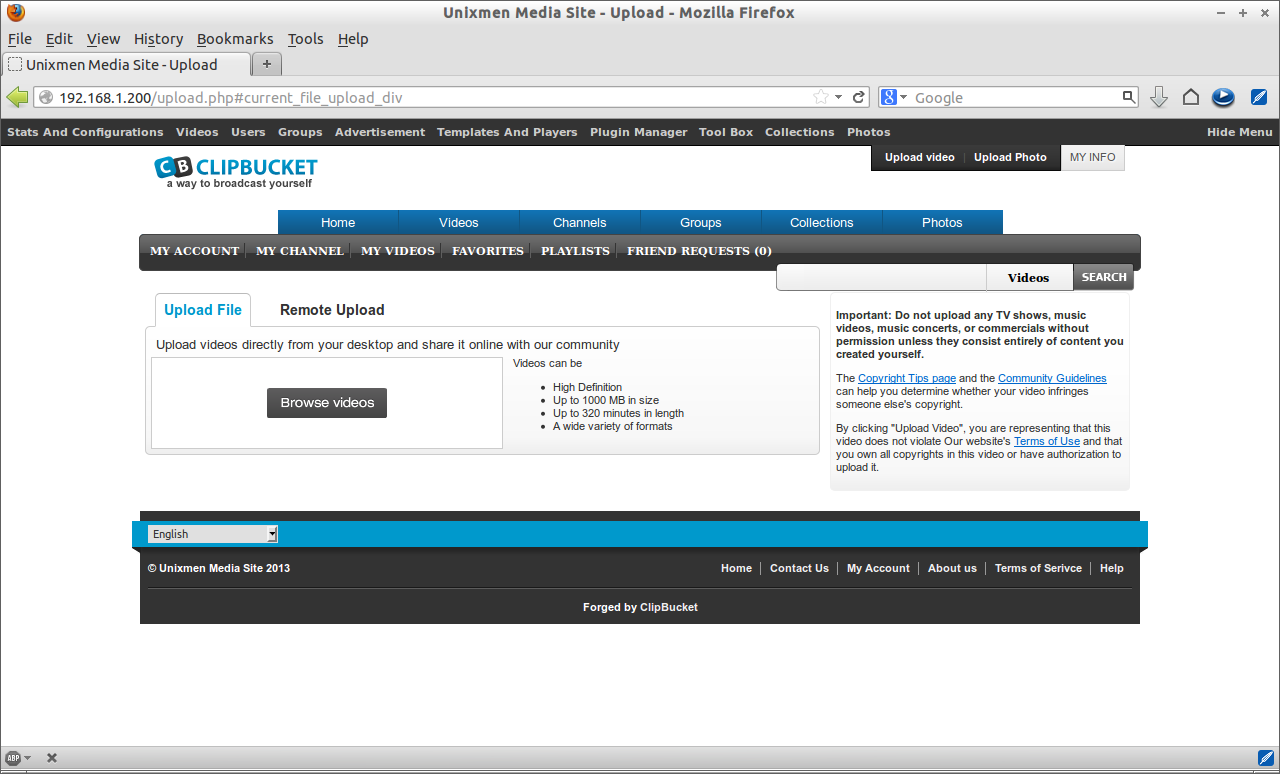
Click on Upload Video on the top right corner of your home page.
Unixmen Media Site - A way to broadcast yourself - Mozilla Firefox_037
Select the videos to upload.
Unixmen Media Site - Upload - Mozilla Firefox_038
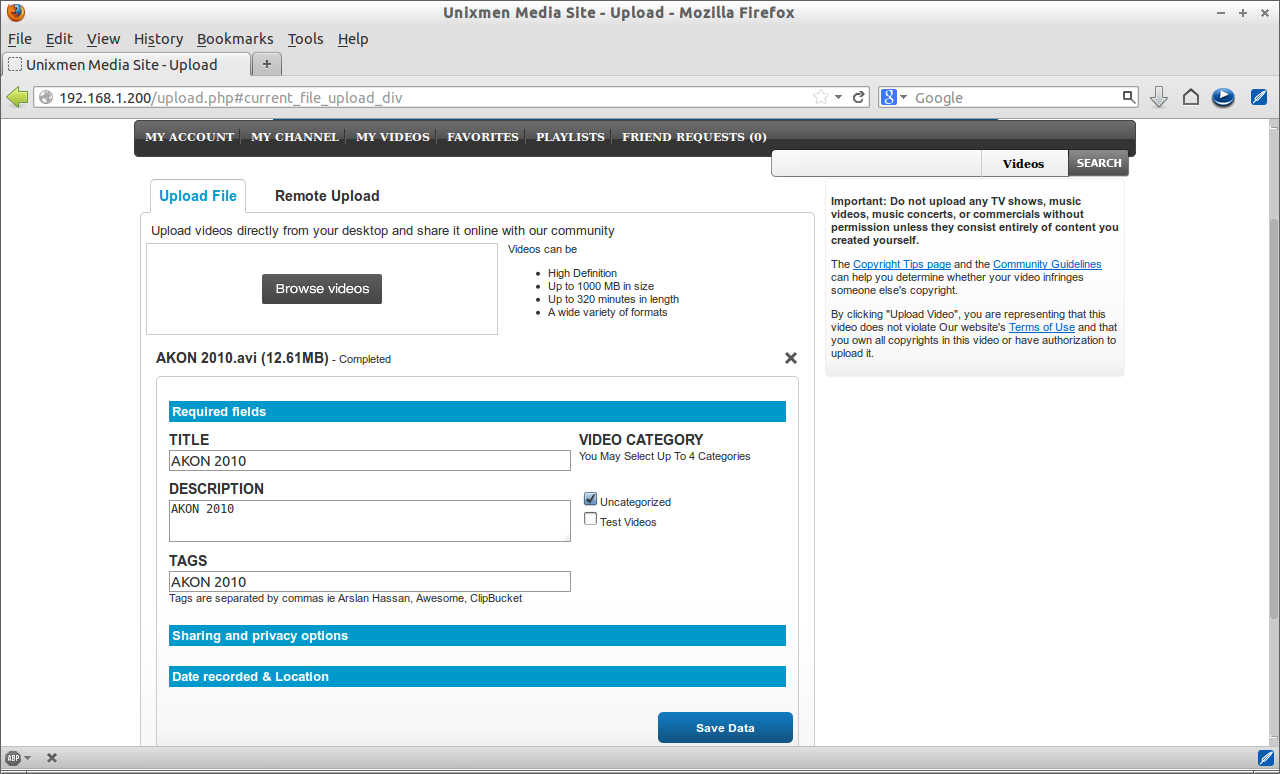
Enter name of the video, description etc. Click Save Data.
Unixmen Media Site - Upload - Mozilla Firefox_040
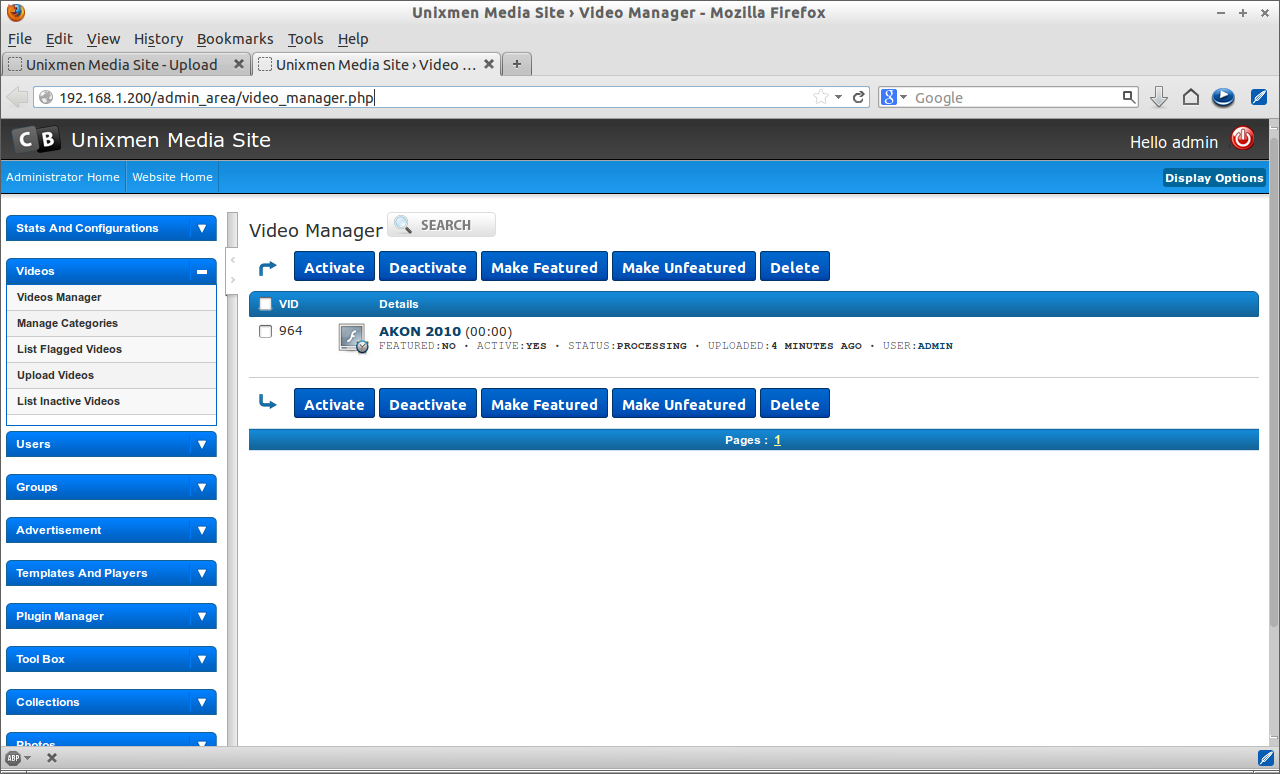
The uploaded data will immediately converted and uploaded to your site. Wait for few minutes. It will take a while depending upon your size of the video. You can view the status of the video on the Video Manager in your Administration Page.
Unixmen Media Site › Video Manager - Mozilla Firefox_041
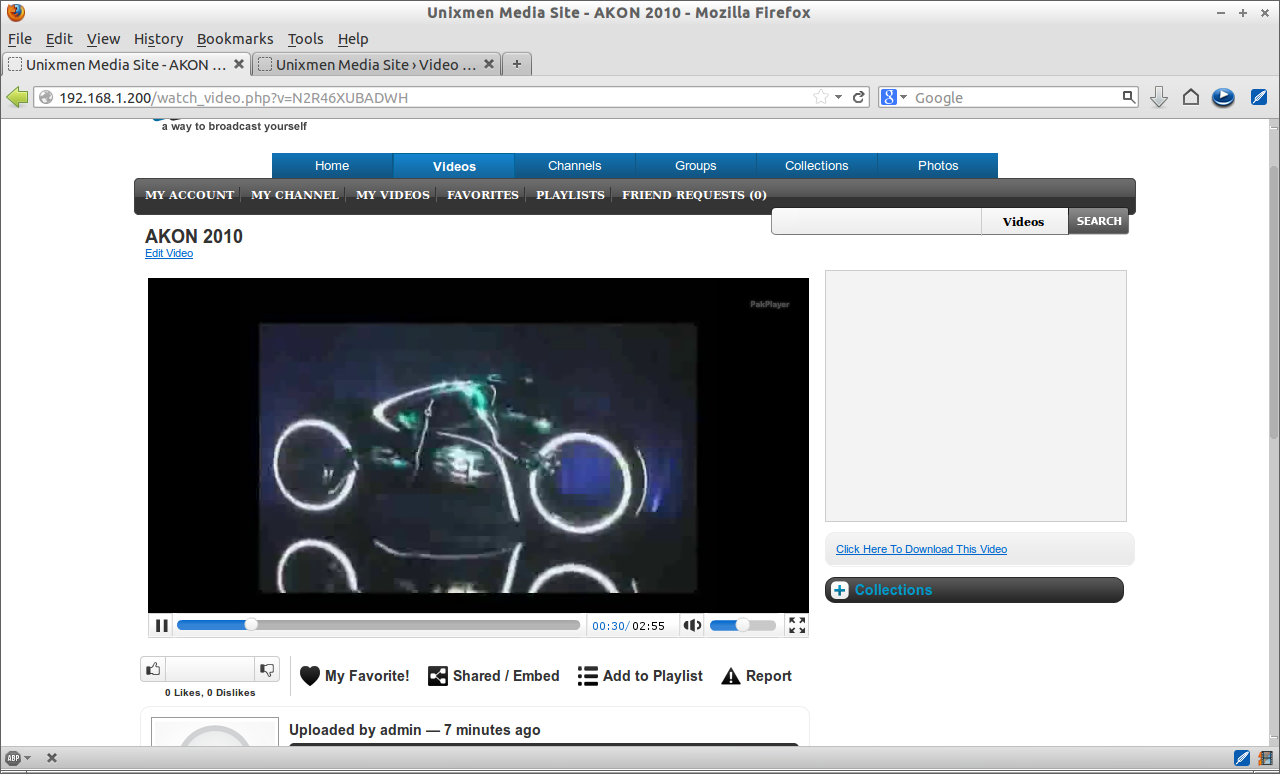
Once the video conversion is finished, your video will appear on your home page. Click on the video to play. This is how my media site looks in live.
Unixmen Media Site - AKON 2010 - Mozilla Firefox_042
That’s it. Enjoy! For more information about ClipBucket installation and usage visit the Official wiki page.